
Step 1: Get Domain and Hosting
Guidelines for choosing a great domain name for your website and brand
- Make it easy to remember for your customers (oxfordseedcompany.com is best than oxseedco.com)
- Shorter is better
- Always use dot com
How to register and domain and set up your web hosting
- Click on this link to get the best deal on Hostgator hosting. (It’s an affiliate link. It costs you nothing extra but I get a small commission which helps me bring you these free tutorials. Thanks in advance!)
- Click on the Get Started Now button
- Click on the Sign Up Now button under plan you want (recommended: Baby Plan)
- Under Choose a Domain, enter the domain name you wish to register
- Under Choose a Hosting Plan, select your package type (recommended: Baby)
- Select your Billing Cycle. Month to month is the lowest commitment, but if you want to save more, chose to pay for a longer period of time.
- Enter a username of your choosing
- Enter in a security PIN
- Under Enter Your Billing Info, enter your billing information
- Under Add Additional Services, uncheck all the additional services. You don’t need them and it will save you a bundle.
- Under Enter a Coupon Code, enter the coupon code ezwebsitesetup. This will give you your first month of web hosting with Hostgator for ONE PENNY!
- Check the box at the bottom of the page next to “I have read and agree to the Terms of Service, Cancellation Policy, and Privacy Policy.”
- Click on Checkout Now! at the bottom of the page.
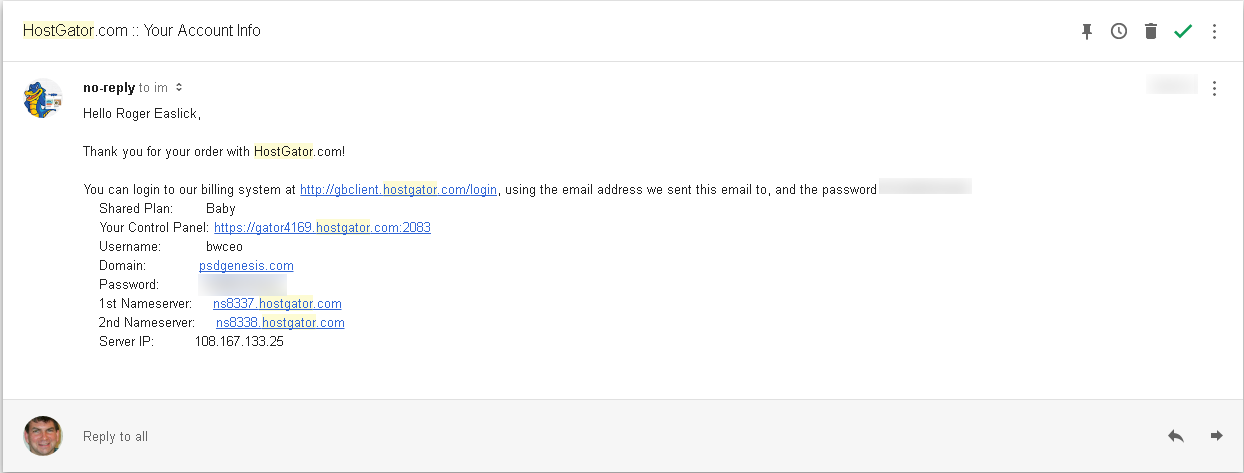
Step 2: Log Into Cpanel
- Check your email inbox for an email like this from hostgator.com
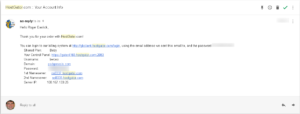
- Click on the link next to Your Control Panel and use the username and password below that link to sign into your Hostgator cPanel.
Step 3: Install WordPress
- Under the Software and Services section of cPanel (toward the bottom), click on the QuickInstall icon
- Under Popular Installs on the left hand side, click WordPress.
- Under Install WordPress, select the domain you want to install from the dropdown (for most cases you will leave the install/path/here box blank)
- Under Admin Email, enter your email address
- Under Blog Title, enter the name of your website
- Under Admin User, enter a username for your website
- Under First Name, enter your first name
- Under Last Name, enter your last name
- Click on Install WordPress
- Record your username and password from the View Credentials drop down at the top of the QuickInstall page.
Step 4: Log Into Your WordPress Website
- Type your website name followed by forward slash wp-admin (e.g., http://sandboxwp.com/wp-login)
- Enter your username and password and click Log In
Step 5: Download and Install Theme
- From the WordPress Dashboard, hover over Appearance and click on Themes
- Click on Add New at the top of the page
- Type Sydney in the Search themes box on the right hand side and press Enter
- Click on Install in the Sydney theme
- Click Activate
Step 6: Deactivate and delete unwanted plugins
Step 7: Install Necessary Plugins
Install suggested plugins
- Click on the link Begin installing plugins at the top of the page
- Check the box next to Plugin under Install Required Plugins
- Select Install from the Bulk Actions drop down directly above
- Click Apply
- Click on Return to Required Plugins Installer link
- Check the box next to Plugin under Install Required Plugins
- Select Activate from the Bulk Actions drop down directly above
- Click Apply
Install other plugins
- Hover over Plugins on left side and click on Add New
- Type name of plugin into the Search Plugins box on the right
- Click on Install Now in the plugin you want to install
- Click on Activate to activate the plugin
- Repeat steps 1-4 for the plugins below:
- Black Studio TinyMCE Widget
- Child Theme Configurator
- Contact Form 7
- Recent Posts Widget Extended
- SiteOrigin Widgets Bundle
Step 8: Create Child Theme
Step 9: Upload demo content
- Download the demo images
- Extract the files from the ZIP file
- Hover over Media and click Add New
- Select all images in the folder
Step 10: Create Homepage and Blog Page
Homepage
- From the WordPress Dashboard, hover over Pages in the menu and select Add New
- Enter Homepage as the title
- Under Page Attributes on the left side select Front Page as the template
- Click Publish
Blog
- From the WordPress Dashboard, hover over Pages in the menu and select Add New
- Enter Blog as the title
- Click Publish
Step 11: Set Home and Blog Pages
- From the WordPress Dashboard, hover over Appearance in the menu and select Customize
- Click on Static Front Page
- Under Front Page select Home from the drop down
- Under Posts Page select Blog from the drop down
- Click Save & Publish at the top
Step 12: Change Slider Settings & Images
Change Slider Settings
- Under the Customize menu click on Header area
- Click Header type
- Under Front page header type select Full screen slider
- Under Site header type select No header (only menu)
- Return to the Customize menu and click on Header Slider
Change Slider Images
- Under the Customize menu click on Header area
- Click Header slider
- Under the slide you want to change click Change image
- Modify the Title and Subtitle under the slide as desired
Step 13: Change Theme Option Settings
- Change the fonts
- Under the Customize menu click on Fonts
- Change the Body font size to 16
- Change the color
- Under the Customize menu click on Colors
- Change the Primary color to #ef0303
- Change the Menu background color to #ef0303 as well
- Blog options
- change to masonry grid
- Change the excerpt length to 20
Step 14: Create Logo and Favicon
- Create your logo
- Go to http://logomakr.com
- Click on the x in the upper right corner to close the tutorial
- Click Next, Next and Done
- Type for your search term in the Search Graphics box (e.g., camera)
- Change the logo to white
- Click on the disk icon in the upper right to save logo (name logo.png)
- Create your favicon
- Change the color of your image to black (#000000)
- Click on disk icon to save image (name favicon.png)
- Upload the logo to your website
- Under the Customize menu click on Site title/tagline/logo
- Under Upload your logo click on Select Image
- Select the image from the Media Library or upload another image by clicking on the Upload Files tab
- Click Save & Publish
- Upload the favicon (site icon)
- Under Site Icon click on Select Image
- Select the image from the Media Library or upload another image by clicking on the Upload Files tab
- Click Save & Publish
Step 15: Create Services Section
- Create Services
- Click Add New Service under Services
- Enter title of service (e.g., Photography)
- Enter text description for service
- Scroll down to the Service info section. Click “here” in “Example: fa-android. Full list of icons is here. (New page (“Cheatsheet”) will open in separate browser tab.)
- Copy shortcode for service icon from list on the Cheatsheet. (Example: fa-camera-retro, fa-codepen, fa-desktop)
- Paste shortcode into Service info box in website tab.
- Create a new category under the Categories section on the right side of the page by clicking on the Add New Category link and adding the name of the new category into the box. Example: “Group A” (This step is only required for the first service in this group.)
- Select the new category you just created. Uncheck “Uncategorized” if necessary.
- Click Publish on the right side of the screen.
- Repeat steps A-J for additional services. You can skip step G for the additional services in this group. Make sure you select the same category for the additional services. All services in this group should have the same category.
- Add widget for services on the Home page
- From the WordPress Dashboard, click on Pages
- Click on the title of your Home Page
- From the Page Builder tab on the right click on Add Row
- Change the Set row layout setting to 1
- Click Insert
- Customize row
- Hover over the wrench and click Edit Row
- Under Row Styles click Theme
- Under Bottom Border Color change the setting to #e0e0e0
- Click Done
- Under Row Layout select Full Width from the drop down
- Click Update
- Add Sydney FP: Services Type A Widget
- Click on Add Widget
- Select the Sydney FP: Services Type A widget
- Click on Edit within the widget
- Enter the title for the services (e.g., Our Services)
- Under “Enter the slug….” enter the category for the services (e.g.,“type-a”)
- Click Done
- Click Update
Step 16: Create Info Call to Action Section
- Click Add Row
- Change number of rows to 1
- Click Insert
- Customize row
- Hover over the wrench and click Edit Row
- Under Row Styles click Theme
- Under Background Color change the setting to #252525
- In the Top/bottom padding box enter 50
- Under Background Image click Select Image (or upload new by clicking on Upload Files tab at top
- Click Done
- Under Row Layout select Full Width from the drop down
- Click Save
- Add a Row for CTA
- Click Add Widget
- Select the Layout Bilder widget
- Click on Edit within the Layout Bilder
- Click Add Row within the Layout Bilder
- Set row layout to 1
- Click Insert
- Click Add Widget from within the Layout Builder
- Select the Text Widget
- Click Edit within the Text Widget
- Enter the title within the Title box (e.g., Discover Who We Are)
- Click Done
- Configure Title Row within Layout Builder
- Hover over the wrench of the Text widget
- Click on Theme on the right side
- Under Top/bottom padding enter 0
- Click Select Color and change it to #ef0303
- Click Done
- Create second row of CTA
- Click Add Row
- Change number of rows to 2
- Click Insert
- Click Add Widget
- Select Sydney FP: Call to action widget
- Click Done
- On the Sydney FP: Call to action widget click Duplicate
- Drag one of the widgets to the other side
- Configure left side CTA widget
- Click Edit within the widget
- Leave title blank
- Add text to Enter your call to action box
- Add link URL in the Link for the button box (e.g., http://ezwebsitesetup.com/meet-the-team)
- Enter the title for the button in the Title for the button box
- Enter the URL (Web address) of where you want to link to
- Add CSS for left CTA button
- Click on the Attributes tab under Widget Styles on the left
- In the CSS Styles box, enter the text background-color: rgba(0,0,0,0.3);
- Click Done
- Configure right side CTA widget
- Click Edit within the widget
- Leave title blank
- Add text to Enter your call to action box
- Add link URL in the Link for the button box
- Enter the title for the button in the Title for the button box
- Add CSS for right CTA button
- Click on the Attributes tab under Widget Styles on the left
- In the CSS Styles box, enter the text background-color: rgba(0,0,0,0.3);
- Modify padding for CTA row
- Hover over the wrench above the CTA row
- Click Edit Row
- Enter 0 for the Top/bottom padding
- Click Done, Done and Update
Step 17: Create Employees Section
- Create the employees
- Hover over Employees in the Dashboard and click Add New Employee
- Enter the name of the employee in the box Enter title here
- Click Set featured image at the bottom right
- Select an image of the employee from the Media Library or upload an image from the Upload Files tab
- Click Set featured image
- Under Categories click Add New Category
- Enter a unique category name (e.g., emp1). Each employee should have a unique category.
- Click Enter and assure that the category that you just created is selected.
- Click Publish
- Repeat steps 1-8 for two additional employees
- Add Row in Page Builder
- From the Home page (Dashboard->Pages) click Add Row
- Change number of rows to 1
- Click Insert
- Drag the newly created row to the bottom on the page
- Configure Row
- Hover over the wrench and select Edit Row
- Click on Theme on the right side
- Under Top/bottom padding enter 40
- Click Done
- Add Visual Editor Widget
- Click Add Widget
- Select the Visual Editor widget
- Click Edit from within the Visual Editor widget
- Enter a title (e.g., Meet Our Team)
- Click Done
- Add Sydney FP: Employees Widget
- Click Add Widget
- Select the Sydney FP: Employees widget
- Click Edit from within the widget
- Change the Number of employees to show to 3
- In the box Enter the slug for your category or leave empty to show all employees enter the categories of your employees separated by a comma (e.g., emp1, emp2, emp3)
- Click Done
- On the Home page click Update
Step 18: Create Facts Section
- Click Add Row
- Change number of rows to 1
- Change Background color (under Design) to #ef0303
- Change Color to #fff
- Change Top/Bottom Padding (under Layout) to 50
- Change Row Layout to Full Width
- Click Insert
- Click Add Widget
- Select the Sydney FP: Facts widget
- Click Edit from within the widget
- Fill in the fact name and value for each of the facts
- Enter an icon code for each of the facts. (The icon shortcodes may be found by clicking the link at the top of the page.)
- When finished, click Done
- Click Update on the Home page
Step 19: Create Testimomials Section
- Create Testimonials
- Hover over Testimonials in the Dashboard and click Add New Testimonial
- Enter the name of the person giving the testimonial in the box Enter title here
- Enter the text of the testimonial
- Enter the client function or company name
- Click on Add New Category
- Enter the name of a unique category for the testimonial (e.g., t-one)
- Press Enter
- Click Publish
- Repeat steps 1-8 as needed for additional testimonials
- Create Testimonial Section
- Click Add Row
- Change number of rows to 1
- Click Insert
- Change Row Layout (under Layout) to Full Width
- Change the Color (under Background Image) to #fff
- Click Select Image
- Select an image from your Media Library or import an image from the Upload Files tab
- Click Add Widget
- Select the Sydney FP: Testimonials widget
- Click Edit from within the widget
- Enter the categories of the testimonials you created in the box starting with Enter the slug…
- Click Done
- Click Update on the Home page
Step 20: Change the Permalinks
Step 21: Create Latest News (Blog) Section
- Create Blog Posts
- Hover over Posts in the Dashboard and click Add New
- Enter the title of your post
- Enter the text of your post
- Click on Set featured image
- Choose the post category or create a new category as desired
- Click Publish
- Repeat steps 1-6 as needed for addition bl;og posts
- Create Blog Post Section on Home Page
- From the Home page, click Add Row
- Change number of rows to 1
- Click Insert
- Click Add Widget
- Select the Sydney FP: Latest News widget
- Click Edit from within the widget
- Enter text for title (“Latest News”)
- Click Done
- Click Update
Step 22: Create Contact Call to Action
- From the Home page, click Add Row
- Change number of rows to 1
- Click Insert
- Drag new row to bottom if necessary
- Click Add Widget
- Select the Sydney FP: Call to action widget
- Add text to Enter your call to action box
- Add link URL in the Link for the button box
- Enter the title for the button in the Title for the button box (“Contact Us”)
- Check the box next to Display the button inline with the text?
- Under Design click Select Color for Headings color
- Click Clear
- Click Done
- Hover over the wrench and click Edit Row
- Under Row Styles click Theme
- In the Top/bottom padding box enter 30
- Under Background Color enter the color (#252525)
- Click Save
- Click Update
Step 23: Create Social Media Widget Section
- Enable SiteOrigin Widgets
- Hover over Plugins
- Click on SiteOrigin Widgets
- Turn on the SiteOrigins Social Media Buttons widget
- Create row for social media widgets section
- From the Home page, click Add Row
- Change number of rows to 1
- Click Insert
- Drag new row to bottom if necessary
- Hover over the wrench for the row and click Edit Row
- Under Layout change Top/bottom padding to 10
- Change Row Layout to Full Width
- Under Design change the Backgroud color to #1c1c1c
- Click Done
- Click Add Widget
- Select the SiteOrigins Social Media Buttons widget
- From within the widget click the Edit link
- Click on Add under the Networks section
- Click on Select network
- Select network
- Enter URL text for the URL
- Change the Background color to #252525
- Repeat steps 8-12 for additional networks as desired
- Under Design and Layout change the Button theme to Flat
- Change Padding to Low
- Change Align to Center
- Click Done
- Click Update on the Home page
Step 24: Create About Page
- Hover over Pages in the Dashboard and click Add New
- Change the page Template to Front Page
- Click on Add Row in Page Builder
- Hover over the wrench and select Edit Row
- Click on Theme on the right side
- Under Top/bottom padding enter 40
- Under Row Layout select Full Width
- Click Done
- Click Add Widget
- Select the Visual Editor widget
- Click Edit from within the Visual Editor widget
- Enter About Us as the title
- Add some text
- Click Add Media
- Select an existing image or import a new image from the Upload Files tab
- Click Insert into page
- From Youtube.com select a video
- Click on the Share link under the video
- Copy the Embed URL underneath the video (e.g, https://youtu.be/9xJla_WJ4s4)
- Click on the Text tab in visual editor
- Paste the URL at the bottom for the box
- Click Done
- Click Update
Step 25: Create Employees Page
- Hover over Pages in the Dashboard and click Add New
- Enter in the title of the page (e.g., Employees)
- Change Template to Front Page
- Click on Add Row in Page Builder
- Hover over the wrench and select Edit Row
- Click on Theme on the right side
- Under Top/bottom padding enter 40
- Under Row Layout select Full Width
- Click Done
- Click Add Widget
- Select the Sydney FP: Employees widget
- Click on Edit from within the widget
- Enter Employees as the title
- Click Done
- Click Update from within the Employees page
Step 26: Create Projects (Portfolio) Page
- Create Projects
- Hover over Projects in the Dashboard and click Add New
- Enter in the title of the project
- Click on Set featured image
- Create or select a Category
- Click Publish
- Repeat steps 1-6 for additional projects
- Create Projects (Portfolio) Page
- Hover over Pages in the Dashboard and click Add New
- Enter in the title of the page (e.g., Portfolio)
- Change Template to Front Page
- Click on Add Row in Page Builder
- Hover over the wrench and select Edit Row
- Click on Theme on the right side
- Under Row Layout select Full Width
- Click Done
- Click Add Widget
- Select the Sydney FP: Portfolio widget
- Click on Edit from within the widget
- Enter “Our Work” as the title
- Enter the category slugs separated by a comma
- Click Done
- Click Update from within the Portfolio page
- Create Contact Call to Action (See Step 22, above)
Step 27: Create Contact Us Page
- Create Contact Form
- Hover over Contact in the Dashboard and click Contact Forms
- Click on Contact form 1
- Click on the Mail tab
- Enter your email address next to To
- Click Save
- Create the Contact Us page
- Hover over Pages in the Dashboard and click Add New
- Enter in the title of the page (e.g., Contact Us)
- Change Template to Front Page
- Add Page Title Row
- Click on Add Row in Page Builder
- Hover over the wrench and select Edit Row
- Click on Theme on the right side
- Under Top/bottom padding enter 40
- Under Row Layout select Full Width
- Click Done
- Add Contact Information and Contact Form Section Row
- Click Add Widget
- Select the Visual Editor widget
- Click Edit from within the Visual Editor widget
- Enter “Contact Us” as the title
- Click Done
- Click on Add Row in Page Builder
- Hover over the wrench and select Edit Row
- Set the row layout to 2
- Change the 50% to 70% on the left
- Change the 50% to 30% on the right
- Click on Theme on the right side
- Under Top/bottom padding enter 20
- Under Row Layout select Full Width
- Click Done
- Click Add Widget
- Select the Visual Editor widget
- Click Duplicate from within the Visual Editor widget
- Drag the second Visual Editor widget to the other side
- Click Edit from within the Visual Editor widget on the left
- Enter or paste contact information into the Visual Editor
- From the toolbar click on the line button to add a solid line below your information
- Click Done
- Click Update from within the Contact Us page
- Add Contact Form
- Hover over Contact in the Dashboard and click Contact Forms
- Click on Contact form 1
- Right click and copy the shortcode from within the contact form
- Hover over Pages in the Dashboard and click All Pages
- Click on the Contact Us page
- From within the Visual Editor on the right, click Edit
- Paste the contact form shortcode into the text area
- Click Done
- Click Update from within the Contact Us page
- Add Google Map
- Click Add Widget
- Select the SiteOrigin Google Maps widget
- Click Edit from within the widget
- Enter a street address in the Map center box
- Enter 250 for the Height
- Click on the API key link under the API key box
- Click on GET A KEY in the upper right
- Create a new project or select from list
- Click ENABLE API
- Right click and copy the API code
- Paste the API code in the API key box of the Site Origin Google Maps widget
- Click Done
- Click Update from within the Contact Us page
- Create Social Media Icons
- Click on Add Row in Page Builder
- Hover over the wrench and select Edit Row
- Click on Theme on the right side
- Under Top/bottom padding enter 10
- Change Background color to #1c1c1c
- Under Row Layout select Full Width
- Click Done
- Click Add Widget
- Select the SiteOrigin Social Media Buttons widget
- From within the widget click the Edit link
- Click on Add under the Networks section
- Click on Select network
- Select network
- Enter URL text for the URL
- Change the Background color to #252525
- Repeat steps 8-12 for additional networks as desired
- Under Design and Layout change the Button theme to Flat
- Change Padding to Low
- Click Done
- Click Update on the Contact Us page
Step 28: Customize Blog Widgets
Step 29: Make Header Menu
Step 30: Modify Footer
Paste the following into the Theme Footer file:
<div class=”site-info container”>
Copyright © 2016 <a href=”http://www.ezWebsiteSetup.com” target=”_blank”>ezWebsiteSetup.com</a>. Image credits <a href=”https://si.smugmug.com/” target=”_blank”>Simon Tong Photography</a> and <a href=”http://athemes.com/” target=”_blank”>aThemes</a>.
</div>
Paste the following into the Stylesheet file
.site-footer {
text-align: center;
}